Friday, November 30, 2007

Oh Christmas Tree!

While I continue to wait for this little girl to make her move and come into our world I am trying to keep busy. One of my to do list items was to turn the fabric I bought a few years ago to wrap around the Christmas tree base into a proper tree skirt. The fabric was found on clearence and was quickly bought the morning of our first Holiday party to hide the tree stand. It had done a good job, but I had always intended on doing something more with it. Well with Taylor's help and some more fabric I transformed the fabric into a skirt.

So first I had to make my square piece of fabric with a slit cut to the center into a circle. To do this I folded the square in half, and in half again and then diagonally. So that the center of the fabric remained as point. I measured from the point to 20 inches out into the fabric and placed a pin. I did this along an arch and then cut along the pin line leaving me with a shape like this.
Making a circle
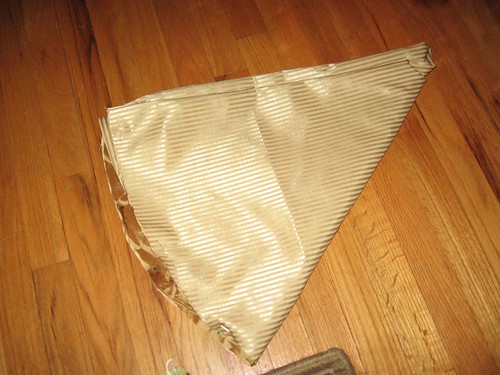
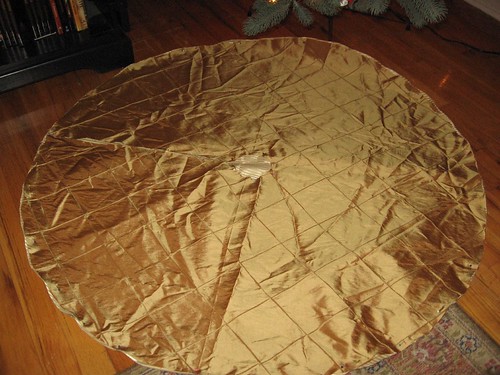
Once opened this leaves me with a pretty darn nice circle
Top fabric opened up
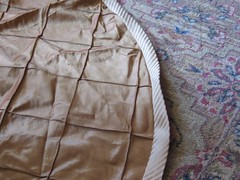
With both the top and bottom pieces of fabric now in the shape and size I wanted I decided to join the pieces with bias tape. So I purchased a 1 inch bias tape maker thing, and followed the directions and made enough with my leftover base fabric to edge the circle and go up both sides of the slit. Here it is sewn onto the top layer of fabric.
Bias tape on Tree skirtBias tape on skirt
Tree skirt slit, with Bias tape
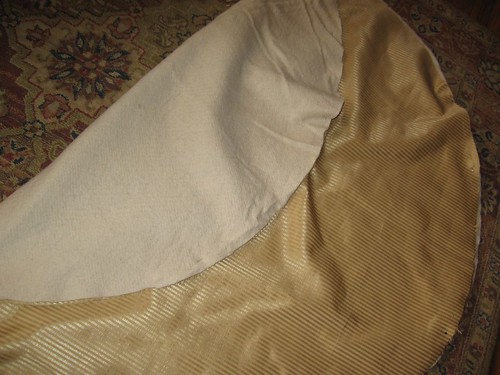
So the next step was that I cut out some cotton batting and basted it onto the base fabric. Just to hold the layers together.
Tree skirt fabric with batting
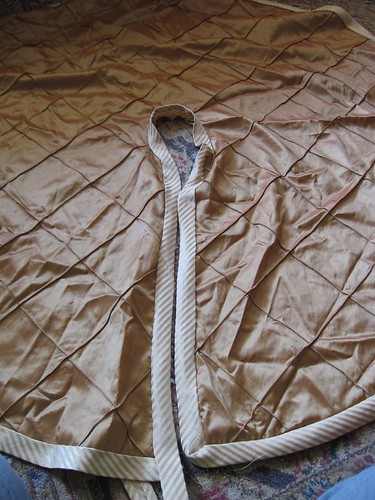
Then I pinned the top and bottom together, right sides facing and sewed the back onto the other side of the bias tape. I left the center hole open so I could turn skirt right side out when I was finished.
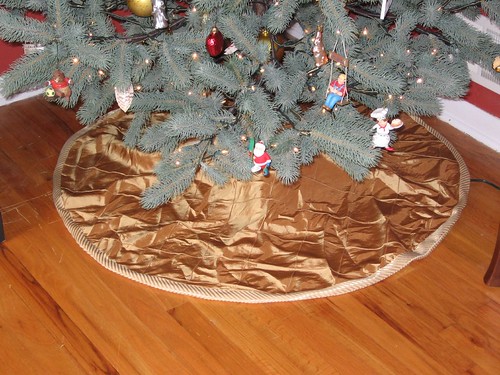
Here is the nearly finished skirt posing with our tree...
Finished Tree Skirt

What I learned
While I am quite happy with the end look of the skirt, there was things that could be done better. The top layer of fabric should have been cut about an inch smaller all the way around to compensate for the bias tape. Now the top fabric is larger than the bottom fabric. Not a big deal in my case because I liked the lumpy look of the top fabric, and it is light weight and drapes nicely. I could have found a better way to deal with the transition of the bias tape from the circle edge to the slit. I just kinda fudged it and made it bend. It is behind the tree though and I am going to live with it. I am thinking of top stitching along the bias tape edge to kind of hold it down or something. Still have to hand sew some of it together... but I think it is done for this Christmas. Afterall, the tree is wearing it and looking quite dashing. It can be finished another day.

Sunday, November 25, 2007

So much, yet nothing at all

I feel like I have been so busy trying to get stuff done before this baby arrives. Racing against the clock to finish projects. However I don't know how much time is left on our clock. We where happy to make it through Thanksgiving and spent a very nice night visiting with my family. I was also greatful to have these past three days to ourselves as well. I only wish I could share what I have been up too. See, much of it is a surprise for a couple of blog readers. So the rest of you must suffer so that we can keep the surprises surprises. I guess it will give me something to post about another day. Until then, I leave you with some puppy zen.
Sleepy Friends

Friday, November 9, 2007

Bend the Rules Valance

Last week I was a busy little sewer, and have not yet taken any time to share with you my project. Sadly I was too caught up in the activity to take any in progress photos. It was an experiment and I was just interested in getting to the end result to pause for picture taking.

After being inspired by the Scalloped Baby blanket that Cara made for sproggy I decided I would use the same pattern concept for the nursery window valance. The pattern can be found in Bend the Rules Sewing. I adjusted the size to fit across the window, and left the top straight. Also, I applied a simple pocket to the back for the curtain rod to slide through.

Nursery Valance and Rocker

Close up
Nursery Valance

I added two stripes of the ribbon left over from the crib skirt to break up the pattern some. Never mind the short tab of ribbon hanging below the finished edge. There are plans for that.
Nursery valance

So my question for you is..... Do I need long curtains under the valance? Like some pink shears? Just something to make it look more finished? Every time I walk in the room I feel like maybe it is missing something. Advice is greatly appreciated!
Nursery wide

Here is the most recent belly picture I have right now... for one particular reader :o) My belly is the bottom of the two. The top belly belongs to a friend Lisa. She is due anytime now, if she hasn't already had her little man!
IMG_0887

Have a happy weekend everyone!

Friday, November 2, 2007

Pie Season

Some of you who know me and my weird eating habits might find this post to be a little un-Amanda like. But in typical Amanda fashion, there is always more than meets the eye. See, I don't really like pie. Particuraly the crust. Now there are exceptions to the rule. I eat pumpkin pies, but I scoop the filling from the crust. And I eat pecan pie with the crust, as it isn't scrapable. Fruit pies are a total waste on me.
However I do love making pie. Go figure right?

It is the time of year that I consider Pie Season. Maybe it is easy to define a season for this dessert because I only seem to eat fall pies- pecan and pumpkin. Maybe it is because this was the time of year mom and I stayed up late cramming for Thanksgiving by baking pies until we couldn't stay awake any longer. In any case, this pie crust recipe is the best I have used. Passed to me from my mother, and she received it from her sister, my Aunt B. It comes together so easily, and is always a big hit with pie crust lovers... or so I am told.

Aunt B's Pie Crust
makes enough for two crusts, or one double crust.
3 cups all purpose flour
1 cup Crisco
1/2 tsp salt
1 egg, lightly beaten
1 TBSP white vinegar
7 TBSP cold water

So first step you combine the flour, Crisco, and salt with a pastry blender until crumbly.
Crumbly Flour, Crisco, Salt mixture

Next, add the wet ingredients- lightly beaten egg, vinegar and cold water.
Add the wet ingredients

Mix to combine wet and dry ingredients until dough comes together
Combined dough

Split the dough into two even sections. At this point it can be rolled out for your pie, or refridgerated until you are ready to use it. When you roll out the dough lightly flour the surface to keep it from sticking to the rolling pin or the counter top.
Pie Crust

Last step is to fill it with your pie filling and bake according to the pie recipe. I made the Oatmeal Pecan Pie recipe from Cooking Light's November 2006 issue.
Oatmeal Pecan Pie, before baking

Enjoy!!